[CI/CD with Drone 101] 01 Basic Service Setup and GitHub Integration
Setting up automated deployment process with Drone, including basic service configuration and GitHub integration
Utilizing Drone
to establish your own automated deployment service.
Drone is a CI/CD system tool developed in Golang.
This article covers the configuration of basic services and integration with GitHub.
Why use Drone
- Supports major Git repositories: GitHub, GitLab, Bitbucket, Gitea, etc.
If your project uses Git version control, integrating with Drone is straightforward. - CI process is described in a YAML file, easy to understand, and flexible to adjust.
Anyone with experience in Docker Compose should be able to get started quickly. - Developed in Go, the service starts up very quickly.
- Docker-based service, can be quickly ported to different platforms.
Especially suitable for running in Kubernetes cluster environments. - Drone’s community has various plugins available, and custom plugins can be created in various languages.
Just package it into an image to easily integrate it into the CI process.
Divided into server and runner, the server is responsible for collecting events from Git repositories.
When it detects conditions defined in the pipeline, such as a push to a specific branch,
it triggers the pipeline process, assigning it to different types of runners for execution.
Common runners include Docker runner, Kubernetes runner, SSH runner, etc.
Basic Setup
Locally use docker-compose to set up the Drone 1.10 service (as version 1.0 does not have an SSH runner).
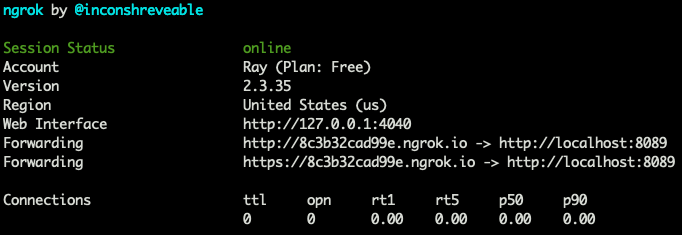
Use ngrok to allow external connections to reach localhost on port 8089, serving as the callback URL for GitHub webhook.
Note: Ngrok is restarted several times in between; some screenshots may have different ngrok URLs.
Any URL ending with ngrok.io in the article is the externally accessible URL provided by ngrok service.
STEP 1
docker-compose.yml
version: '3.7'

services:
  drone-server:
    container_name: drone_server
    image: drone/drone:1.10
    ports:
      - 8089:80
    volumes:
      - /var/lib/drone:/data
      - /var/run/docker.sock:/var/run/docker.sock
    restart: always
    environment:
      - DRONE_GITHUB_CLIENT_ID=${DRONE_GITHUB_CLIENT_ID}
      - DRONE_GITHUB_CLIENT_SECRET=${DRONE_GITHUB_CLIENT_SECRET}
      - DRONE_AGENTS_ENABLED=true
      - DRONE_RPC_SECRET=${DRONE_RPC_SECRET}
      - DRONE_SERVER_HOST=${DRONE_SERVER_HOST}
      - DRONE_SERVER_PROTO=${DRONE_SERVER_PROTO}
      - DRONE_TLS_AUTOCERT=${DRONE_TLS_AUTOCERT}
      - DRONE_CRON_INTERVAL=1m
      - DRONE_USER_CREATE=${DRONE_USER_CREATE}
      - DRONE_USER_FILTER=${DRONE_USER_FILTER}

  drone-ssh-runner:
    container_name: drone-runner-ssh
    image: drone/drone-runner-ssh
    depends_on:
      - drone-server
    environment:
      - DRONE_RPC_HOST=${DRONE_SERVER_HOST}
      - DRONE_RPC_SECRET=${DRONE_RPC_SECRET}
      - DRONE_RPC_PROTO=${DRONE_SERVER_PROTO}
      - DRONE_RUNNER_CAPACITY=${DRONE_RUNNER_CAPACITY}

  drone-docker-runner:
    container_name: drone_runner_docker
    image: drone/drone-runner-docker:1
    depends_on:
      - drone-server
    volumes:
      - /var/run/docker.sock:/var/run/docker.sock
    environment:
      - DRONE_RPC_HOST=${DRONE_SERVER_HOST}
      - DRONE_RPC_SECRET=${DRONE_RPC_SECRET}
      - DRONE_RPC_PROTO=${DRONE_SERVER_PROTO}
      - DRONE_RUNNER_CAPACITY=${DRONE_RUNNER_CAPACITY}
You can save some sensitive information in a .env file at the same level as docker-compose.yml.
For example, ${DRONE_GITHUB_CLIENT_SECRET} can be kept outside of version control.
For details on the configuration parameters, refer to the official documentation .
Set DRONE_CRON_INTERVAL=1m to make the Drone server check for pending cron jobs every minute. The default is 30m, so some users may experience delayed execution of cron jobs after service startup. It’s not a delay in execution but rather the behavior of the Drone server not triggering cron detection promptly: Reference
.
Define the parameters directly in the .env file. Note that DRONE_SERVER_HOST does not need to include the protocol.
.env
# Configuration for GITHUB OAuth App
DRONE_GITHUB_CLIENT_ID=
DRONE_GITHUB_CLIENT_SECRET=

# Admin account settings
DRONE_USER_CREATE=username:ray247k,admin:true

# People with access permissions; for GitHub, you can use an organization for configuration
# Not applicable for Bitbucket
DRONE_USER_FILTER=ray247k,lemon

# Drone Server URL; using ngrok here as an example
DRONE_SERVER_HOST=56662cd578da.ngrok.io

# If using a reverse proxy with self-signed certificates, set this to http and false
DRONE_SERVER_PROTO=https
DRONE_TLS_AUTOCERT=true

# Random password for security
DRONE_RPC_SECRET={random_password}

# Number of concurrent jobs; must not be 0
DRONE_RUNNER_CAPACITY=3

# Interval for checking pending cron jobs
DRONE_CRON_INTERVAL=1m
Generate DRONE_RPC_SECRET using the following command:
openssl rand -hex 16
STEP 2
If you already have a URL available, you can skip this step.
Expose IP with Ngrok for External Connections
Bind the localhost port 8089 of the recently set up Drone server to a specific ngrok URL.
This URL will need to be copied and pasted into the GitHub OAuth App settings later.
ngrok http 8089
STEP 3 - GitHub OAuth App Configuration
Navigate to the GitHub OAuth App settings page to create a new OAuth application.
Profile Picture (top-right)->Settings->Developer settings tab on the left->OAuth Apps
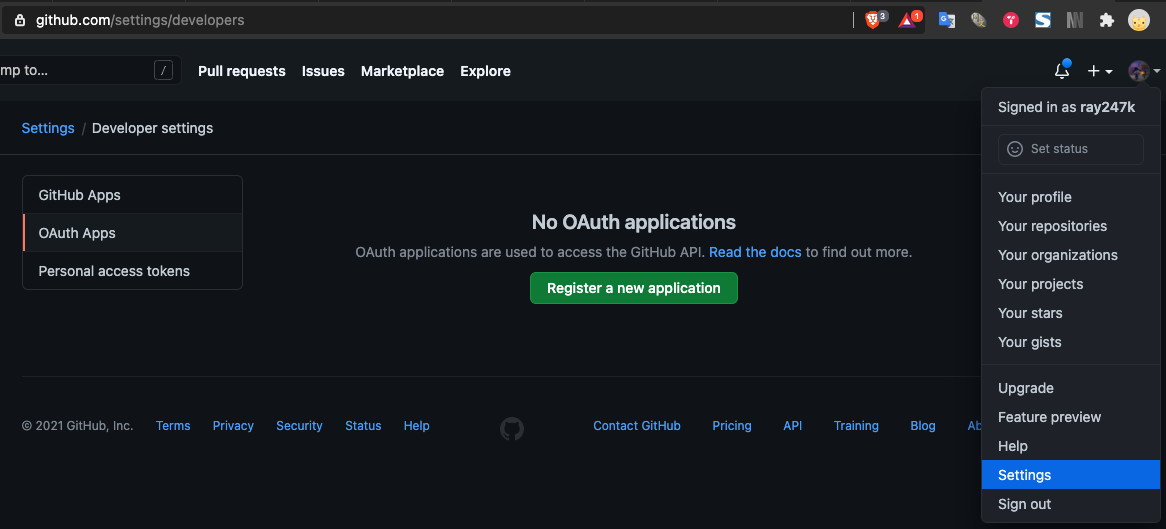
Start by creating a new OAuth App.
Enter the ngrok URL you just created and register the OAuth application.
Set the callback URL to /login.
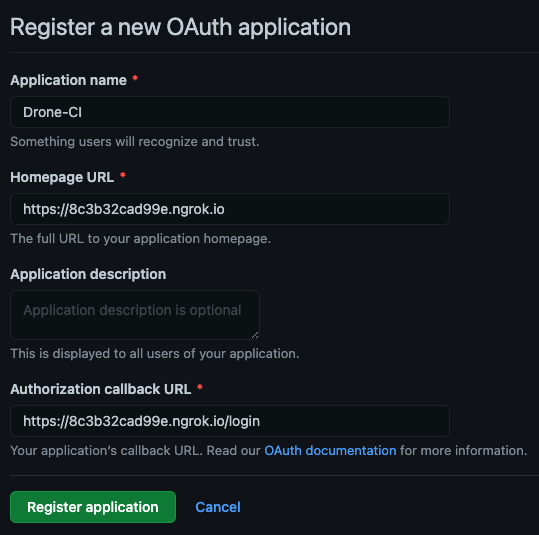
After creating, it’s time to integrate Drone CI with GitHub.
STEP 4
Modify Drone Configuration
Open the GitHub APP settings you just created.
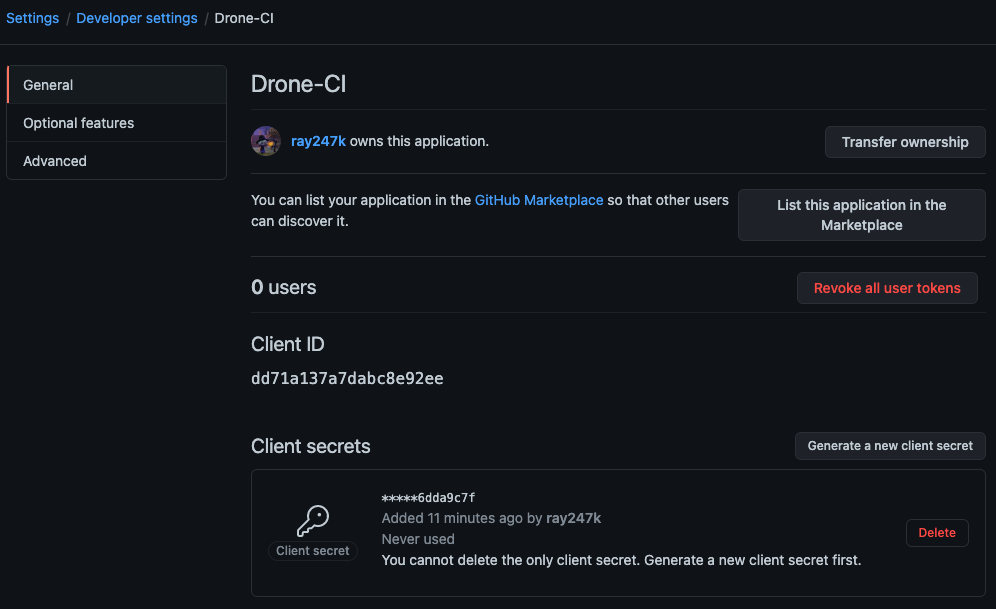
Modify the DRONE_GITHUB_CLIENT_ID and DRONE_GITHUB_CLIENT_SECRET in the docker-compose.yml file to match the values of Client ID and Client Secret on the GitHub App settings page.
After making the changes, restart the Drone service using docker-compose.yml, and access your ngrok URL to check the setup.
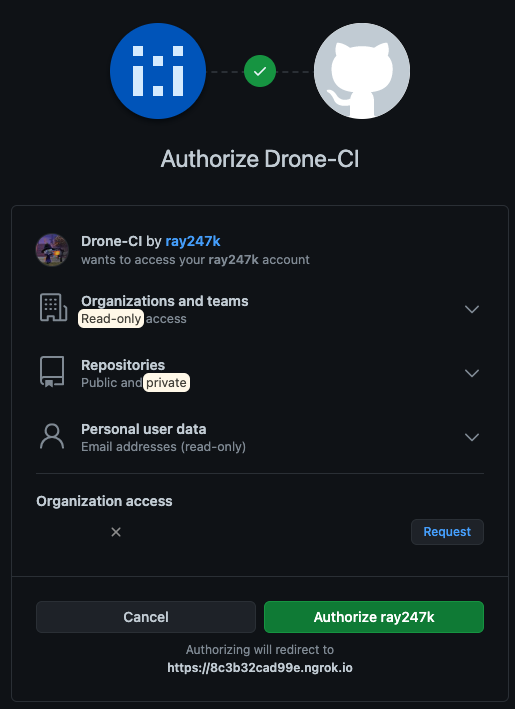
Once you successfully authenticate, it means your Drone CI integration is complete! Congratulations!
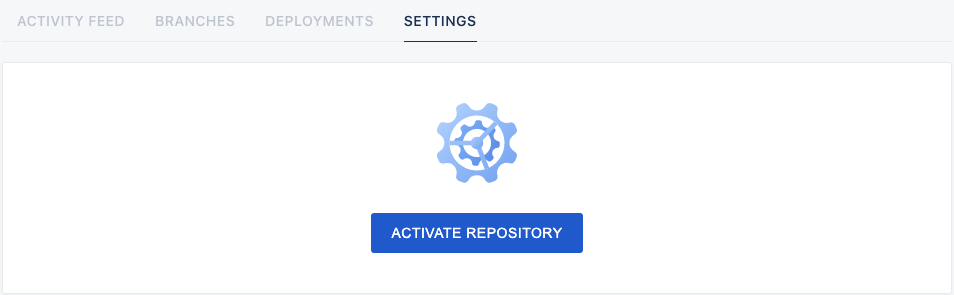
STEP 5
Activate Services
Following the previous steps, you should be able to open your ngrok URL and see the Drone dashboard.
Upon entering, you’ll find all your repositories.
Choose any repository, click on it, and press the “ACTIVATE REPOSITORY” button in the center to enable the webhook for the project.
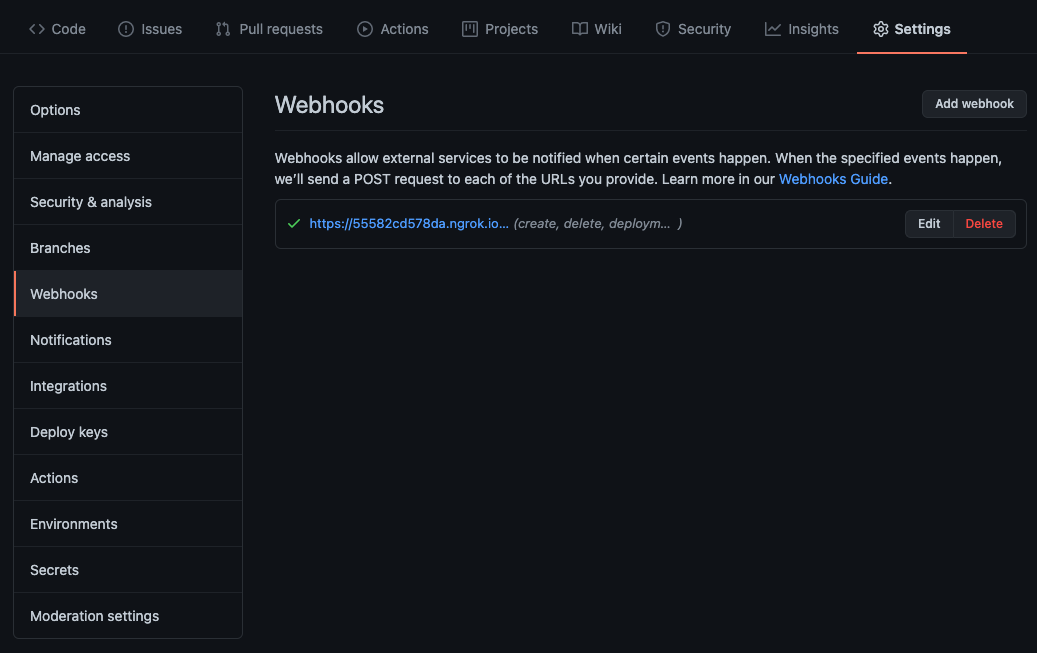
To confirm, you can open the “Repository -> Settings -> Webhooks” on GitHub, and you should see a webhook in use.
Clicking on it will reveal more settings or allow you to view the requests sent by the webhook.