Operating Google Forms with GAS (Google App Script)
Leveraging GAS (Google App Script) services to utilize Google Forms as a simplified database.

When the back office isn’t fully established but the frontend is already live, there’s a desire to enable non-programmers to autonomously adjust the website’s content.
Alternatively, in cases where temporary content needs to be recorded without creating a dedicated database table, we often resort to managing this data through Google Forms.
Let’s be clear from the outset: these practices are all makeshift solutions!
Google Forms itself comes with quite a few limitations; if you use it as a formal database, it will bring you a lots of troubles.
If it doesn’t, it means your service is too trivial to even measure.
Starting small isn’t a problem in the early stages. The flexibility it offers allows non-programmers to modify content themselves before the formal editing interface is in place, saving the hassle of relying on tech personnel to deploy new program versions.
There are two ways to retrieve data from Google Forms.
One method involves publishing the form online, allowing access to specified output types of form content via a URL,
commonly exporting as a CSV file.
Advantages:
- Simple operation, everyone can do it.
- No need for additional programming; once set up, data can be accessed directly through the URL.
Disadvantages:
- Published content gets cached by Google: despite claims of updating after modifications, actual updates may take roughly three to five minutes. If your content requires real-time access for the latest data for decision-making, issues may arise.
As for the second method, it’s aimed at resolving the aforementioned drawbacks, for which we’ll utilize Google’s GAS (Google App Script) service.
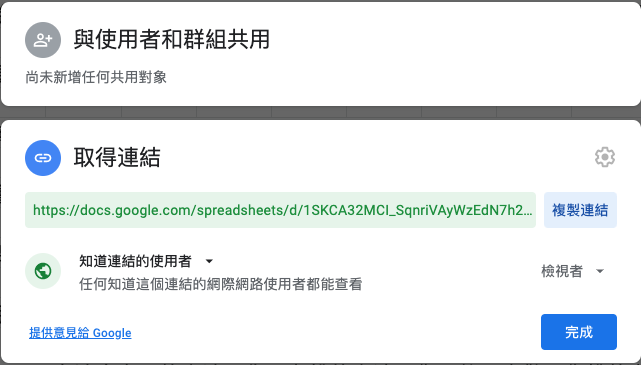
1. Creating a Google Form
Since we’re discussing “operating Google Forms,” it makes perfect sense to create a Google Form, right?
Set it as ‘Shared for Viewing.’
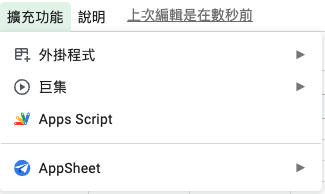
2. Setting Up a New Google App Script Project
You can create one on the Google App Script Projects page , or directly access it within Google Sheets by opening the Extensions menu.
3. Writing Google Script
Now that we have the Google Form ready and know where to write the code for operations.
The next step is to craft the script for execution. While writing, refer to the official reference documentation
.
Find the necessary functions in the documentation to operate the Google Form.
Explanation of Shared Parameters
Here are some commonly used functions explained together:
e.parameter
Retrieves all incoming parameters that subsequent program operations can utilize.
To use:
let params = e.parameter
params.sheetTag
Refers to the name of the bottommost worksheet in Google Sheets.
This can be passed as a variable to simultaneously write to or read from multiple different worksheets.

Usage involves calling sheetTag after obtaining all incoming variables:
let sheetTag = params.sheetTag
params.sheetId
Represents the ID of the Google Form, used for identification.
Passing this as a parameter helps differentiate between the formal or testing environment.
Use your own ID; I’ve removed it from this document!

Usage includes calling sheetId after retrieving all incoming variables:
let sheetId = params.sheetId
Data Retrieval
Next, let’s discuss how to retrieve data.
The function used for fetching form data must be named deGet, where all get methods funnel into this function.
Refer to the built-in methods for:
- Retrieving the last row and column numbers.
- Obtaining all data within a specified range.
- Returning data in JSON format.
You can explore these inherent methods by referencing the aforementioned official documentation.
function doGet(e) {
  let params = e.parameter

  let sheetTag = params.sheetTag
  let sheetId = params.sheetId

  let SpreadSheet = SpreadsheetApp.openById(sheetId)
  let Sheet = SpreadSheet.getSheetByName(sheetTag)

  let lastRow = Sheet.getLastRow()
  let lastColumn = Sheet.getLastColumn()

  // getSheetValues(startRow, startColumn, numRows, numColumns)
  let values = Sheet.getSheetValues(1, 1, lastRow, lastColumn)

  let jsonString = JSON.stringify(Object.assign({}, values))
  return ContentService.createTextOutput(jsonString)
}
Once you’ve finished writing doGet, let’s test if it meets the expected results.
Before directly publishing, utilize the built-in testing tools for verification.
Under the same Google App Script project, add a new file named debugGet.gs.
function debug() {
  var e = {
      parameter:{
        sheetId:"1XuNpMRdZasL8TNovZasd13asd41SoEBo0BMzabGqaE1s",
        sheetTag:"todo"
      }
  }

  let result = doGet(e)
  Logger.log(result.getContent())
}
Once you’ve set up the Google Form to receive data, click ‘Run.’
The returned results will be displayed in the execution results window through Logger.log.
Writing Data
Passing data as a JSON string will sequentially write into the specified worksheet.
An important note: if the data includes URLs, special characters must be escaped when passed.
Unfortunately, native JavaScript lacks a function to revert this formatting.
The workaround involves using the DOM document, which GAS (Google Apps Script) cannot directly call since it operates on the server side.
Therefore, direct replacement is used.
- Convert incoming string data into a JSON object.
- Iterate through the object and write the values from the first row to different columns based on their respective indices.
function doPost(e) {
let params = e.parameter
// Initialize Spreadsheet
let sheetTag = params.sheetTag
let sheetId = params.sheetId
let SpreadSheet = SpreadsheetApp.openById(sheetId)
let Sheet = SpreadSheet.getSheetByName(sheetTag)
let data = JSON.parse(params.data)
let lastRow = 0
// Write to Spreadsheet
data.forEach(function(value){
with(value) {
content = content.replace(/&/g, "&").replace(/</g, "<").replace(/>/g, ">").replace(/"/g, "\"").replace(/'/g, "'")
Sheet.getRange(lastRow + 1, 1).setValue(article_id)
Sheet.getRange(lastRow + 1, 2).setValue(content)
}
lastRow = lastRow + 1
})
return ContentService.createTextOutput(JSON.stringify(true)).setMimeType(ContentService.MimeType.JSON)
}
The testing method is similar to the ‘Get’ process; let’s add a new file named debugGet.gs.
function debugPost(){
  var processing = {
    parameter:{
      sheetId:"1XuNpMRdZasL8TNovZS09Aing41SoEBo0BMzabGqaE1s",
      sheetTag:"processing",
      data: '[{"action":"Bass class","date":"2021/09/12"}]',
    }
  }

  var done = {
    parameter:{
      sheetId:"1XuNpMRdZasL8TNovZS09Aing41SoEBo0BMzabGqaE1s",
      sheetTag:"done",
      data: '[{"action":"Return the book","date":"2021/10/09"}]',
    }
  }

  let result1 = doPost(processing)
  let result2 = doPost(done)
  Logger.log(result1.getContent())
  Logger.log(result2.getContent())
}
We can see that we’ve tested two types of incoming parameters: processing and done.
The only difference lies in the sheetTag passed, representing different worksheets.
The next example is a bit more complex and falls under an extended application:
- Input invitation code and user email.
- Check whether the invitation code still has available quotas
(if all subsequent columns of the same invitation code are filled, in other words, if there are no empty columns for data). - Verify if the user has already registered with the invitation code.
- Write data / Return results.
function doPost(e) {
  let params = e.parameter
  let sheetTag = params.sheetTag
  let sheetId = params.sheetId
  let SpreadSheet = SpreadsheetApp.openById(sheetId)
  let Sheet = SpreadSheet.getSheetByName(sheetTag)

  let invitation_code = params.invitation_code
  let email = params.email

  // Email already exists.
  let user_target_range = Sheet.createTextFinder(email).findNext()
  if(user_target_range !== null) {
    return ContentService.createTextOutput(false)
  }

  // Retrieve all invitation_code
  let ranges = Sheet.createTextFinder(invitation_code).findAll()

  // Iterate through all the results of invitation_code
  let target_row = 0
  ranges.every(function(range){
    let row_num = range.getRowIndex()
    let column_value = Sheet.getRange(row_num, 2).getValue()

    // Retrieve the content of the current target's column B; if empty, set the write-in row number.
    if(column_value == '') {
      target_row = row_num
      return false
    }

    return true
  })

  if(target_row !== 0) {
    Sheet.getRange(target_row, 2).setValue(email)
    return ContentService.createTextOutput(true)
  }

  return ContentService.createTextOutput(false) // Invitation code has been used.
}
Testing function
function debugPost(){
  let params = {
    parameter: {
      sheetId:"1XuNpMRdZasL8TNovZS09Aing41SoEBo0BMzabGqaE1s",
      sheetTag:"done",
      invitation_code: "5XdxPDdv",
      email: '[email protected]'
    }
  }

  Logger.log(doPost(params).getContent());
}
Calling from the Backend
Once testing is successful, you can proceed with publishing.
You’ll obtain an API URL. I haven’t included a screenshot here because Google tends to update its interface constantly.
The layout might change within a few days.
Next, I’ll demonstrate how to send requests from PHP to the GAS API.
private function updateSheet(string $invitation_code): void
{
    $auth_user = auth()->user();
    $user_email = $auth_user->account;

    $client = new \GuzzleHttp\Client();
    $response = $client->request('POST', $this->gas_url, [
        'form_params' => [
            'sheetId'         => $this->sheetId,
            'sheetTag'        => $this->sheetTag,
            'invitation_code' => $invitation_code,
            'email'           => $user_email,
        ]
    ]);

    if ($response->getStatusCode() != Response::HTTP_OK) {
        throw new AppException(Response::HTTP_INTERNAL_SERVER_ERROR, 'The Sheet Die');
    }
}
You can see that we’re using form_params to pass in variables; there isn’t much else to note here.
Let me reiterate: this approach is only suitable when your service is small.
Besides considerations like ACID
, you never know when you might step into a sensitive area for Google.
After retrieving data, it’s advisable to cache it on your own server rather than executing the GAS with every request.
Triggering GAS too frequently might lead to situations where the Google Form becomes inaccessible.