Develop Your Own Laravel Package
Guide on developing and testing Laravel packages locally and installing them using composer in a local project.
The Laravel ecosystem offers numerous convenient packages for various purposes.
However, what if you can’t find a suitable package or need to create a company-specific one?
This article demonstrates how to develop a package locally and install it in a Laravel project using composer, ensuring smooth development and testing.
Some articles suggest creating a packages folder within an existing Laravel project for package development.
However, this approach has drawbacks. Imagine deleting your project one day—your package project would be deleted too.
Additionally, this method doesn’t facilitate testing the installation via composer. This article presents an alternative approach.
1. Initialize Package Project
First, create a folder for your package; for example, we’ll use larapeko as a sample.
mkdir larapeko
Navigate to the newly created larapeko folder and run the following command to initialize the package.
cd larapeko
composer init
You’ll be prompted with a series of questions to configure basic package information.
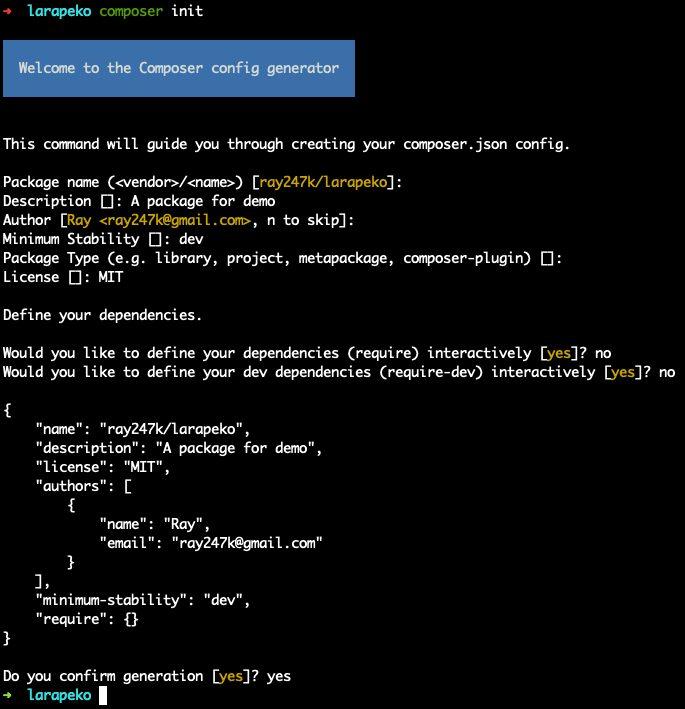
Afterward, you’ll find the composer.json file in the folder.
{
    "name": "ray247k/larapeko",
    "description": "A package for demo peko",
    "license": "MIT",
    "authors": [
        {
            "name": "Ray",
            "email": "[email protected]"
        }
    ],
    "minimum-stability": "dev",
    "require": {}
}
2. Write Package Code
Create a src folder in the larapeko directory to host the package code.
Inside, create a file named LaraPeko.php and set the appropriate namespace.
For demonstration purposes, let’s start with a simple function.
<?php
# LaraPeko.php

namespace Ray247k\LaraPeko;

class LaraPeko
{
    public function sayPeko()
    {
        echo "peko peko\n";
    }
}
3. ServiceProvider
Create a ServiceProvider file in the src directory, named LaraPekoServiceProvider.php.
In the register method, use a singleton to register a class named LaraPeko and return a new instance of it.
<?php
# LaraPekoServiceProvider.php

namespace Ray247k\LaraPeko;

use Illuminate\Support\ServiceProvider;

class LaraPekoServiceProvider extends ServiceProvider
{
    public function boot()
    {

    }

    // Register the package
    public function register()
    {
        $this->app->singleton('LaraPeko', function ($app) {
            return new LaraPeko();
        });
    }
}
4. Facade
Facades
provide a static interface to call registered classes directly.
Create a Facade file in the src directory, named LaraPekoFacade.php, and use the LaraPeko class registered in the ServiceProvider as the Laravel Facade object.
<?php
# LaraPekoFacade.php

namespace Ray247k\LaraPeko;

use Illuminate\Support\Facades\Facade;

class LaraPekoFacade extends Facade
{
    protected static function getFacadeAccessor()
    {
        return 'LaraPeko';
    }
}
5. Default Config and Usage
Sometimes, users may want to customize parameters through a configuration file.
Create a config folder in the package directory and add a configuration file, lara_peko.php.
<?php
# lara_peko.php

return [
    'best_girl' => 'Yagoo',
];
Edit the LaraPekoServiceProvider.php file to include publishing the configuration file.
<?php
# LaraPekoServiceProvider.php

namespace Ray247k\LaraPeko;

use Illuminate\Support\ServiceProvider;

class LaraPekoServiceProvider extends ServiceProvider
{
    public function boot()
    {
        $source = realpath($raw = __DIR__.'/../config/lara_peko.php') ?: $raw;
        $this->publishes([
            $source => config_path('lara_peko.php'),
        ]);
    }

    // Register the package
    public function register()
    {
        $configPath = __DIR__ . '/../config/lara_peko.php';
        $this->mergeConfigFrom($configPath, 'lara_peko');

        $this->app->singleton('LaraPeko', function ($app) {
            return new LaraPeko();
        });
    }
}
After running php artisan vendor:publish, choose the corresponding number for the package when prompted.
This will generate a configuration template file in the project’s config directory.
If you are sure which package’s config file you want to create, you can directly specify the provider tag.
php artisan vendor:publish --provider="Ray247k\LaraPeko\LaraPekoServiceProvider"
In the register method, the default and new configuration files are merged.
If users modify the project’s configuration file, it will override the default configuration, allowing for customization.
Clear Configuration Cache
When the configuration changes, use the following commands to clear the project’s configuration cache.
php artisan config:clear   # Clear the configuration cache
php artisan cache:clear    # Clear the general cache
Using Config Parameters
To use the configuration in your code, employ the config() method.
In the LaraPeko.php file, create a getBestGirl method to retrieve the best_girl parameter from the configuration.
<?php
# LaraPeko.php

namespace Ray247k\LaraPeko;

class LaraPeko
{
    public function sayPeko()
    {
        echo "peko peko\n";
    }

    public function getBestGirl()
    {
        echo config('lara_peko.best_girl');
    }
}
6. Package Auto-discovery
Introduced in Laravel 5.5, this feature allows users to reduce the steps required during package installation by configuring the package settings.
The goal is to eliminate manual editing of the config/app.php file’s providers and aliases arrays after running composer install.
Keywords: Package Auto-discovery, Laravel Extension Package Auto-discovery.
Procedure:
Add the following content to the autoload and extra sections in the package’s composer.json.
Due to length constraints, only the added parts are shown:
{
  "autoload": {
    "psr-4": {
      "Ray\\LaraPeko\\": "src"
    }
  },
  "extra": {
    "laravel": {
      "providers": [
        "Ray\\LaraPeko\\LaraPekoServiceProvider"
      ],
      "aliases": {
        "LaraPeko":  "Ray\\LaraPeko\\LaraPekoFacade"
      }
    }
  }
}
Through the laravel definition in the extra section, a data entry is added to the providers and aliases arrays for registration.
The autoload uses the PSR-4 rule to point the specified namespace to the folder where our package code is located (src).
7. Package Dependencies
If your package depends on another package, such as the commonly used Guzzle, include the required item in the package’s composer.json:
{
    "name": "ray247k/larapeko",
    "description": "A package for demo peko",
    "license": "MIT",
    "authors": [
        {
            "name": "Ray",
            "email": "[email protected]"
        }
    ],
    "minimum-stability": "dev",
    "require": {
        "php": ">=7.3",
        "laravel/framework": "5.5.*||^6.0|^7.0|^8.0",
        "guzzlehttp/guzzle": "^6.3"
    }
}
In addition to requiring Guzzle, we have specified the required PHP version and Laravel framework version.
8. Package Testing
Setting up a Test Project
After the above process, our package is almost configured. Next, we’ll enter the testing phase.
Since we intend to use it in a Laravel project, let’s create a new Laravel project for testing, named “lara-ahoy”:
laravel new lara-ahoy
You can check the installed Laravel version with the following command:
cd <project directory>
php artisan -V
# Laravel Framework 6.20.30
Including the Package in the Project
Add Package Entry
To use the package in the project, use the following command to add the package’s version storage location to the composer.json:
composer config repositories.ray247k path ../larapeko
This assumes that the package (larapeko) and the test project (lara-ahoy) are in the same directory.
After running the command, open the composer.json file in the lara-ahoy project, and you’ll see a new section:
{
    "repositories": {
        "ray247k": {
            "type": "path",
            "url": "../larapeko"
        }
    }
}
You can manually add this section if you prefer not to use the command.
If the package is in a remote repository, change the type to vcs and add the URL:
composer config repositories.ray247k vcs https://github.com/ray247k/larapeko
Or manually adjust the repositories setting in composer.json:
{
    "repositories": {
        "ray247k": {
            "type": "vcs",
            "url": "https://github.com/ray247k/larapeko"
        }
    }
}
The remote URL can use either https or ssh. If the repository is private, use ssh
(e.g., [email protected]:ray247k/larapeko.git).
Add Dependency
You can use the following command:
composer require ray247k/larapeko @dev
Or manually add the following content to the require section in composer.json:
{
    "require": {
        "ray247k/larapeko": "@dev"
    }
}
If an error occurs during the require command due to an issue with a dependency’s version, you can use the --ignore-platform-reqs parameter to ignore the platform:
composer require ray247k/larapeko --ignore-platform-reqs
After adding the local dependency, it will automatically fetch the latest code each time it is used.
If it doesn’t automatically fetch or if you prefer to run composer require every time to update, adjust the symlink setting in the test project’s composer.json under the repositories section:
{
    "repositories": [
        {
            "type": "path",
            "url": "../../packages/my-package",
            "options": {
                "symlink": false
            }
        }
    ]
}
Install the Package
Install the package using:
composer install
In the output, you should see that the package has been discovered and installed:
Discovered Package: ray247k/larapeko
Package manifest generated successfully.
If a version error occurs similar to during the require command, use the --ignore-platform-reqs parameter:
composer install --ignore-platform-reqs
Open the composer.lock file in the lara-ahoy project to verify that the package has been successfully installed.
If you have previously run the project, you must clear the existing autoload cache:
composer dump-autoload
Testing the Package
In the previous steps, we installed our larapeko package into the test project lara-ahoy.
Now, we’ll test whether the package has been correctly integrated using two methods: file testing and unit testing.
Method 1: File Testing
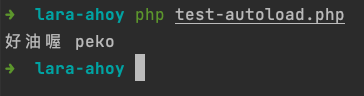
Create a file named test-autoload.php directly in the Laravel project’s root directory.
In this file, load the autoload and call the package method:
<?php
# test-autoload.php

use Ray247k\LaraPeko\LaraPeko;

require_once './vendor/autoload.php';
LaraPeko::sayPeko();
Run the test file in the lara-ahoy project directory:
php test-autoload.php
If the autoload is successful, you should see the result of the sayPeko() method, even if a PHP Deprecated message appears:
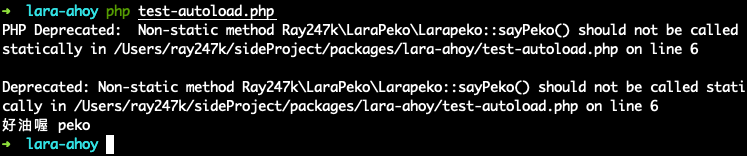
Although a PHP Deprecated message is displayed, the default string content is still successfully printed.
This indicates that the Facade aliases registered in the ServiceProvider were called successfully!
To suppress the PHP Deprecated message, add error_reporting(0); to the test-autoload.php file:
<?php

error_reporting(0);

use Ray247k\LaraP

eko\LaraPeko;

require_once './vendor/autoload.php';

LaraPeko::sayPeko();
Now, you won’t see the PHP Deprecated message:
Method 2: Unit Testing
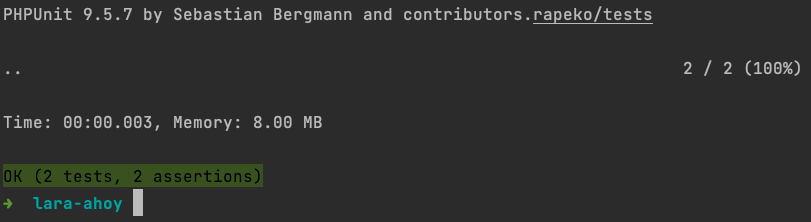
Next, let’s use PHPUnit to perform unit tests. Run the following command in the project directory:
php vendor/bin/phpunit
If you encounter an error related to an invalid value for PHP_VERSION, consider using Homebrew to install PHP or running the tests in a Docker environment.
If php vendor/bin/phpunit works, proceed to build the unit test file.
Add a testing method getAhoy() to LaraPeko.php:
public function getAhoy()
{
    return "ahoy";
}
Create a tests folder inside the package project and add a test file named LaraPekoTest.php:
<?php

namespace Ray247k\LaraPeko;

use PHPUnit\Framework\TestCase;

class LaraPekoTest extends TestCase
{
    /**
     * @test
     *
     * @return void
     */
    public function testClassInstance()
    {
        $this->assertInstanceOf(LaraPekoTest::class, new LaraPekoTest);
    }

    public function testGetAhoy()
    {
        $larapeko = new LaraPeko();
        $this->assertEquals('ahoy', $larapeko->getAhoy());
    }
}
This test checks whether the class instance is correctly created and whether the getAhoy() method returns “ahoy”.
Run the test using the following command:
php vendor/bin/phpunit vendor/ray247k/larapeko/tests
You should see the PHPUnit results:
Note:
Suppose there is a private function testMethod() in the LaraPeko package:
private function testMethod()
{
    return 'Haha';
}
To test a private function, you can use the bindTo() method within a closure.
After creating an object, manually inject it into the closure object to replace $this in the closure.
This way, it’s like directly calling the testMethod() method using the LaraPeko object:
/**
 * @test
 *
 * @return void
 */
public function testMethodTest()
{
    $contentSegment = new LaraPeko();
    $closure = function () {
        return $this->testMethod();
    };

    $closure_bind = $closure->bindTo($contentSegment, $contentSegment);

    $this->assertEquals('Haha', $closure_bind());
}
This allows testing private methods effectively!
The above is a comprehensive guide for developing your own Laravel package.
If you have any further questions or topics to discuss, feel free to let me know. I’m happy to assist!