[Express+Vue 搭建電商網站] 18 套用 Element UI 到頁面上
使用 Express + Vue 搭建一個電商網站 - 套用 Element UI 到頁面上
先前我們已經把電商的基本功能完成了,只是畫面有點差強人意。
在這一節中我們使用 Element UI 來讓畫面更加美觀
安裝 Element UI
Element UI
是一套 Vue 2.0 的組件庫
提供了許多模板。在很多時候可以減少我們重造輪子的麻煩
現在也有 Vue 3.x 的版本了
有三方法可以進行
-
使用 npm 套件管理安裝,這也是官方推薦的作法
npm i element-ui -S -
使用 CDN 安裝
在 index.html 中加入 CDN 連結<!-- 引入样式 --> <link rel="stylesheet" href="https://unpkg.com/element-ui/lib/theme-chalk/index.css"> <!-- 引入组件库 --> <script src="https://unpkg.com/element-ui/lib/index.js"></script>若是使用 CDN 版本作法,建議加入版本號避免因為 Element UI 升級而受到影響
-
使用 vue-ui 鑑於 vue/cli 3.0 的釋出,也提供了從 vue-cli 中安裝的套件 官方說明
導入套件
打開主目錄中的 src/main.js 我們要把剛剛安裝的套件導入到專案中註冊依賴
import Vue from 'vue'
import App from './App.vue'
import router from './router'
import store from './store'

import ElementUI from 'element-ui';
import 'element-ui/lib/theme-chalk/index.css';

Vue.config.productionTip = false
Vue.use(ElementUI);

new Vue({
  router,
  store,
  render: h => h(App)
}).$mount('#app')
除了導入 element-ui 組件庫外,還需要單獨把 CSS 樣式也導入
並且聲明 Vue.use(ElementUI); 來註冊組件庫,接著就是快樂的開始使用組件庫了
重構選單列
打開 src/App.vue 愉快的使用 element-ui 改成酷炫的樣子
<template>
  <div id="app">
    <el-menu
      class="menu"
      :default-active="activeIndex2"
      mode="horizontal"
      @select="handleSelect"
      background-color="#545c64"
      text-color="#fff"
      active-text-color="#ffd04b">
      <el-menu-item index="1"><router-link to="/" tag="div">首頁</router-link></el-menu-item>
      <el-submenu index="2">
        <template slot="title">控制台</template>
        <el-menu-item index="2-1"><router-link to="/admin" tag="div">產品列表</router-link></el-menu-item>
        <el-menu-item index="2-2"><router-link to="/admin/new" tag="div">新增商品</router-link></el-menu-item>
        <el-menu-item index="2-3"><router-link to="/admin/manufacturers" tag="div">製造商列表</router-link></el-menu-item>
        <el-menu-item index="2-4"><router-link to="/admin/manufacturers/new" tag="div">新增製造商</router-link></el-menu-item>
      </el-submenu>
      <el-menu-item index="3"><router-link to="/cart" tag="div">購物車</router-link></el-menu-item>
    </el-menu>
    <router-view/>
  </div>
</template>

<script>
export default {
  name: 'App',
  data() {
    return {
      activeIndex: '1',
      activeIndex2: '1'
    };
  },
  methods: {
    handleSelect(key, keyPath) {
        console.log(key, keyPath);
    }
  }

};
</script>

<style>
#app {
  font-family: Avenir, Helvetica, Arial, sans-serif;
  -webkit-font-smoothing: antialiased;
  -moz-osx-font-smoothing: grayscale;
  text-align: center;
  color: #2c3e50;
  margin-top: 60px;
}
</style>
先不要在意 data 屬性以及 handleSelect 方法,暫時不會碰到
首先看到 <el-menu> 這個標籤,其中的 el-menu-item 帶有幾個屬性
其中 tag 屬性代表將這個內容用 <div> 這個標籤渲染,如果沒設定則預設是 <a> 連結並帶有底線
所以這邊設定為 div 就是為了避免出現底線
重構商品列表
接著要重構 ProductItem 同時因為子組件被修改,所以 ProductList 也需要修改
ProductList
打開 src/components/products/ProductList.vue 將 <template> 部分修改為
<template>
  <div>
    <div class="products">
      <div class="container">This is ProductList</div>
      <!-- <template v-for="product in products"> -->
      <product-item :products="products"></product-item>
      <!-- </template> -->
    </div>
  </div>
</template>
可以藉由註解了解到,原本是分別將產品傳入子組件再進行渲染。但現在變成了傳入全部商品
至於為什麼?就讓我們看下去
ProductItem
打開 src/components/products/ProductItem.vue 修改成以下內容
<template>
  <div class="products">
    <el-table class="table" :data="products" max-height="250">
      <el-table-column prop="name" label="產品名稱" width="180"></el-table-column>
      <el-table-column prop="description" label="介紹" width="180"></el-table-column>
      <el-table-column prop="price" label="售價" width="180"></el-table-column>
      <el-table-column prop="manufacturer.name" label="製造商" width="180"></el-table-column>
      <!-- <el-table-column
        label="圖片""
        width="200">
        <img :src="image" alt="" class="product__image">
      </el-table-column>-->
      <el-table-column label="操作" width="180">
        <template slot-scope="scope">
          <product-button :id="scope.row._id"></product-button>
        </template>
      </el-table-column>
    </el-table>
  </div>
</template>

<style>
.product {
  border-bottom: 1px solid black;
}

.product__image {
  width: 100px;
  height: 100px;
}
</style>

<script>
import ProductButton from "./ProductButton";
export default {
  name: "product-item",
  props: ["products"],
  components: {
    "product-button": ProductButton
  }
};
</script>
第一,針對傳入值改成 props: ["products"], 因為在父組件做了改變,但是為什麼呢?
再往回看 <template> 中,原來是因為 <el-table> 這個表格組件要傳入一個陣列作為 data 屬性
而最後一個 el-table-column 作為按鈕,所以沒有定義 prop 屬性
為了作為按鈕操作,使用了 scope.row 取得指定物件的 id 作為值傳給了子組件 ProductButton 來操作
透過
slot-scope可以取得 row, column, $index 和 store(table 内部的狀態管理)資料
ProductButton
接著就是修改 src/components/products/ProductButton.vue 組件
<template>
  <div>
    <el-button v-if="isAdding" @click="addToCart" type="text" size="small">加入購物車</el-button>
    <el-button v-else @click="removeFromCart(id)" type="text" size="small">從購物車移除</el-button>
  </div>
</template>

<script>
export default {
  props: ["id"],
  computed: {
    product() {
      let product = this.$store.getters.allProducts.find(
        product => product._id === this.id
      );
      return product;
    },
    isAdding() {
      let isAdding = true;
      this.cart.map(product => {
        if (product._id === this.product._id) {
          isAdding = false;
        }
      });

      return isAdding;
    },
    cart() {
      return this.$store.state.cart;
    }
  },
  methods: {
    addToCart() {
      this.$store.commit("ADD_TO_CART", {
        product: this.product
      });
    },
    removeFromCart(productId) {
      this.$store.commit("REMOVE_FROM_CART", {
        productId
      });
    }
  }
};
</script>
使用 element-ui 組件庫提供的按鈕組件 el-button 替換先前普通的按鈕,並且改變了對應的按鈕方法
將父組件傳來的 product 物件換成了單純的 id
因為在 ProductItem 組件中傳入的是指定物件的 id
所以定義了一個 computed product,來取得指定 id 的產品物件
到這邊我們先看看運行的結果
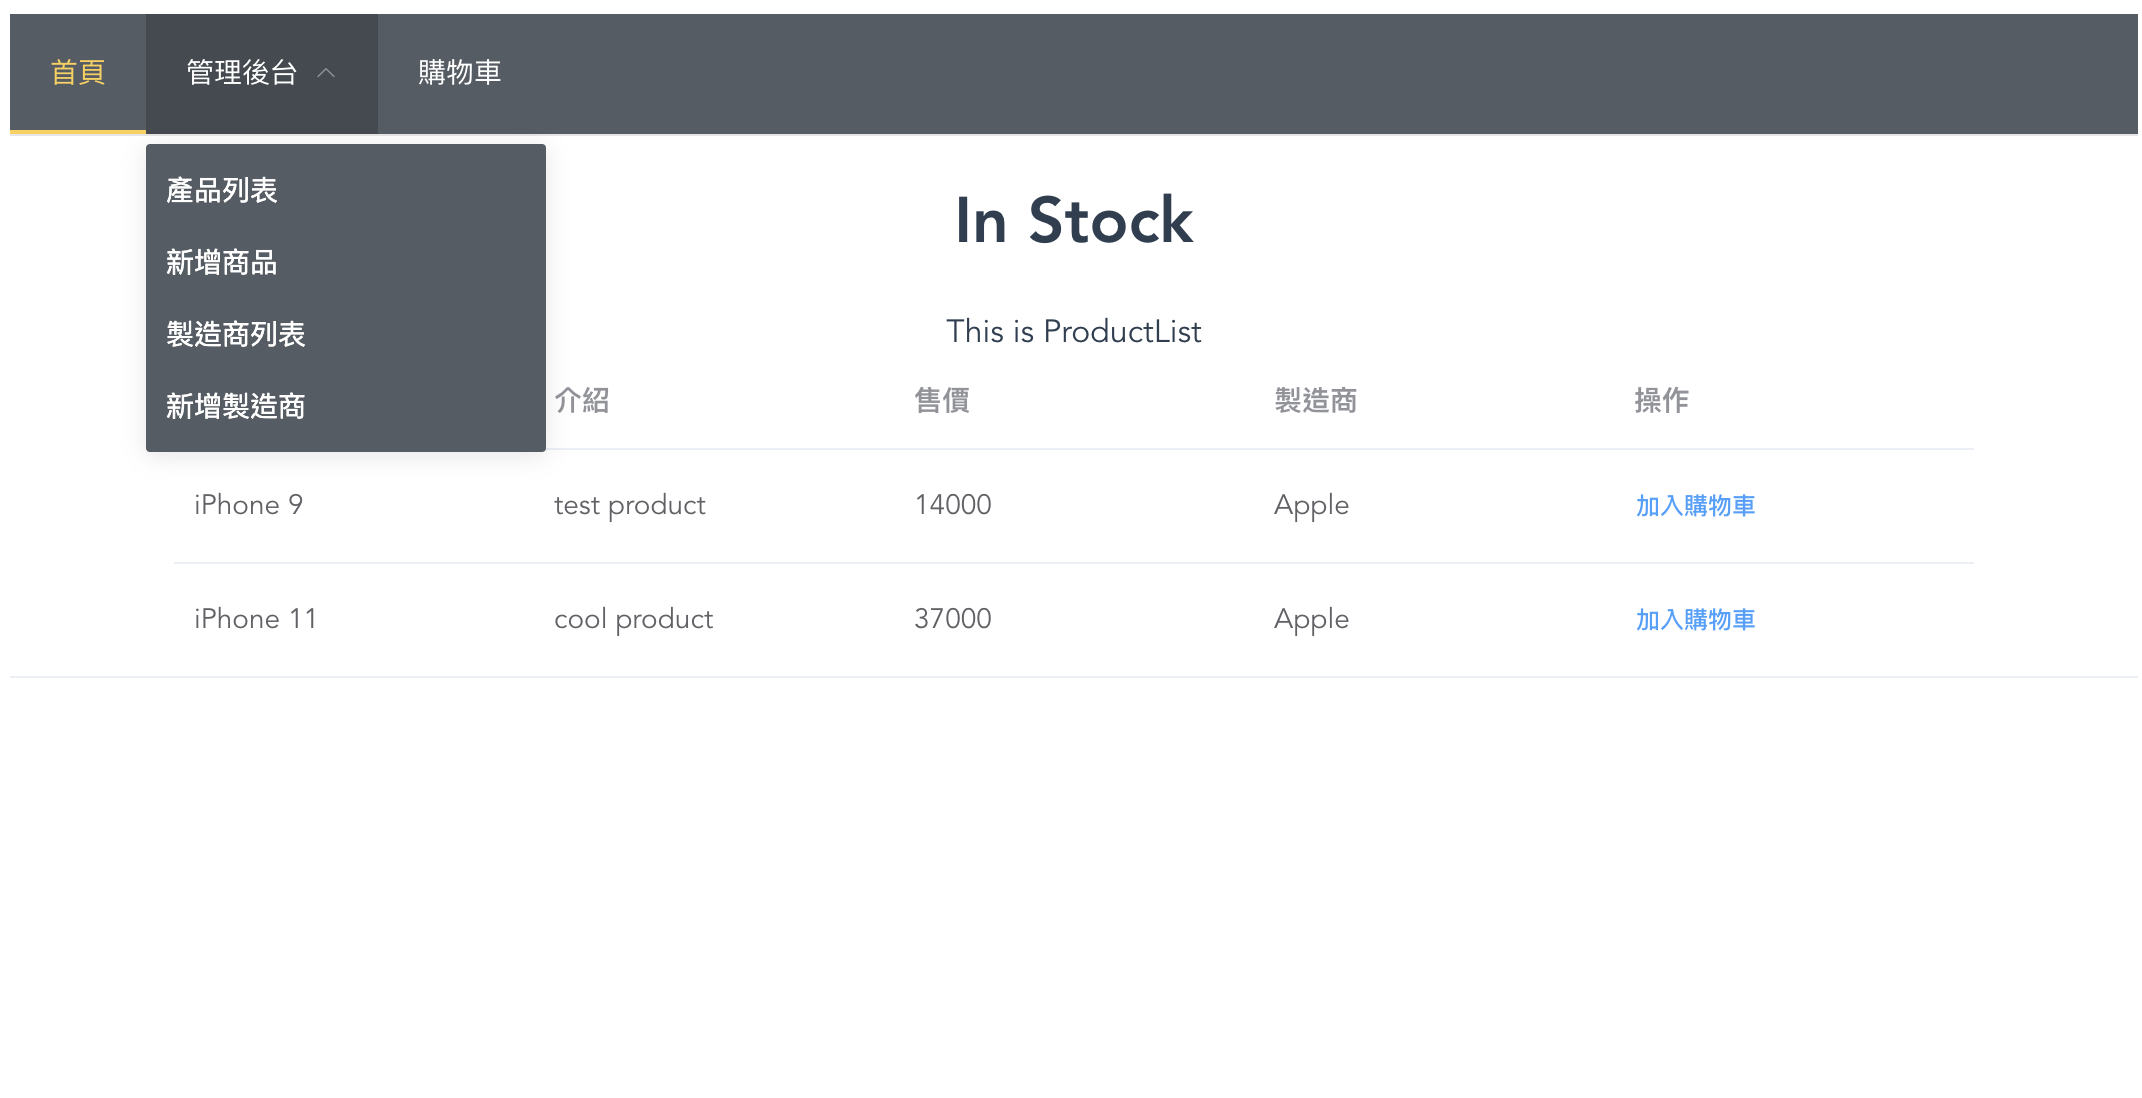
上方的功能列已經變成比較好看的樣式了產品列表也用表單的形式,看起來整齊多了
基本的 Element UI 套用就到這邊,接著我們會把畫面一步步變得更好看!
專案範例程式碼 GitHub 網址:ray247k/mini-E-commerce