[Express+Vue 搭建電商網站] 12 在 Vuex 使用 Mutation 管理狀態
使用 Express + Vue 搭建一個電商網站 - 在 Vuex 使用 Mutation 管理狀態
透過 Mutation 管理 Vuex中的狀態
使用 Mutation
在 Vuex 中 Mutation 是修改 Vuex store 內容的唯一方法
Mutation
是定義在 Vuex store 物件中 mutations 屬性的一系列函數
長得會像
ACTION_NAME(state, payload) {
  return state++;
}
其中 ACTION_NAME 就是組件發出的事件或動作的名稱
這個函數接收兩個參數 state 和 payload。state 就是在 Vuex store 裡面儲存的 state
payload 則是跟著呼叫的事件或是動作一起傳來的參數
然後就可以對現有的 state 做操作而回傳新的 state,透過這種方式我們可以輕鬆的管理所有狀態
初始化 mutations 狀態
打開 src/store/index.js 檔案,修改其中的 state
並加入 mutations,這邊我們先把資料寫死,未來會接上先前寫的後端 API
import Vue from 'vue';
import Vuex from 'vuex';

Vue.use(Vuex);

export default new Vuex.Store({
  strict: true,
  state: {
    // bought items
    cart: [],
    // ajax loader
    showLoader: false,
    // selected product
    product: {},
    // all products
    products: [
      {
        _id: '1',
        name: 'iPhone 11',
        description: '全新雙相機系統,捕捉所見所愛,範圍更多更廣。智慧型手機歷來最快速的晶片,加上滿足一天的電池續航力,讓你完成更多事,充電更少次。而智慧型手機中最高的影片畫質,讓你的點滴回憶,看起來比過去更加動人精彩。',
        image: 'https://i.gadgets360cdn.com/large/iPhone11_leak_1567592422045.jpg',
        price: 44000,
        manufacturer: 'Apple Inc'
      },
      {
        _id: '2',
        name: 'Pixel 4',
        description: '只要用Pixel 4 拍照,不用進工作室後製編輯,也能拍出相同品質的相片!Pixel 4 是第一支能夠拍下銀河的手機,只要輕輕一點,就能拍下美麗星空。',
        image: 'https://pgw.udn.com.tw/gw/photo.php?u=https://uc.udn.com.tw/photo/2019/10/16/realtime/6946830.jpg',
        price: 24990,
        manufacturer: 'Google'
      },
      {
        _id: '3',
        name: 'Xperia 1 II',
        description: '由於 Sony 先前整合了 Mobile 手機部門到 Sony 本家消費性電子產品部門的緣故,所以這次以這樣的命名方式出現也不讓人意外。',
        image: 'https://timgm.eprice.com.tw/tw/mobile/img/2020-02/24/5484360/innocences_1_a8c4b844f3c0c83646b79e366c3d8111.jpg',
        price: 29000,
        manufacturer: 'SONY'
      },
      {
        _id: '4',
        name: 'V30S',
        description: 'LG V30 S ThinQ 最大的改變是 Vision AI 功能的加入,拍照的同時相機會自動識別畫面中的場景,準確的設定場景模式。',
        image: 'https://img.eprice.com.tw/img/mobile/5858/large.png',
        price: 12500,
        manufacturer: 'LG'
      },
      {
        _id: '5',
        name: 'Galaxy Note 9',
        description: '做為三星每年下半年度的旗艦手機,Note 系列從 2011 年的第一代 Galaxy Note 起,就以 S Pen 做為最大賣點,並且帶動大螢幕智慧手機的風潮直到今日。',
        image: 'https://timgm.eprice.com.tw/tw/mobile/img/2018-08/09/5115231/hat7029_1_77763a4f06a1fba43ab32e66d90bcba1.jpg',
        price: 18900,
        manufacturer: 'Samsung'
      }
    ],
    // all manufacturers
    manufacturers: [],
  },
  mutations: {
    ADD_TO_CART(state, payload) {
      const { product } = payload;
      state.cart.push(product)
    },
    REMOVE_FROM_CART(state, payload) {
      const { productId } = payload
      state.cart = state.cart.filter(product => product._id !== productId)
    }
  }
});
除了 state 中暫時寫死的商品內容外,我們加了兩個 mutations 屬性下的方法
分別代表組件中「將商品加入購物車」以及「從購物車移除移出商品」的動作
ProductList 組件
接著要新建「商品列表」的組件,用來展示商品詳細資訊
新建 /src/components/products/ProductList.vue
<template>
  <div>
    <div class="products">
      <div class="container">This is ProductList</div>
      <template v-for="product in products">
        <div :key="product._id" class="product">
          <p class="product__name">產品名稱:{{product.name}}</p>
          <p class="product__description">簡介:{{product.description}}</p>
          <p class="product__price">價錢:{{product.price}}</p>
          <p class="product.manufacturer">生產商:{{product.manufacturer}}</p>
          <img :src="product.image" alt class="product__image" />
          <button @click="addToCart(product)">加入購物車</button>
        </div>
      </template>
    </div>
  </div>
</template>

<style>
.product {
  border-bottom: 1px solid black;
}

.product__image {
  width: 100px;
  height: 100px;
}
</style>

<script>
export default {
  name: "product-list",
  computed: {
    // a computed getter
    products() {
      return this.$store.state.products;
    }
  },
  methods: {
    addToCart(product) {
      this.$store.commit("ADD_TO_CART", {
        product
      });
    }
  }
};
</script>
在 <script> 中定義了一個 computed 作為商品資料的預處理
這樣在模板渲染時就只需要使用 {products} 就可以取得在 Vuex store 中的 products 資料
然後定義了一個點擊事件 addToCart 來處理加入購物車按鈕的點擊
會通過 this.$store.commit 方法
將目前商品物件 {product} 當作 payload 來操作 Vux store 中 mutation 所定義的 ADD_TO_CART 方法做狀態修改
組件建立完之後要在畫面引入才能使用
修改首頁 src/pages/Home.vue 把剛剛建立的 ProductList.vue 組件加入畫面
<template>
  <div>
    <div class="title">
      <h1>In Stock</h1>
    </div>
    <product-list></product-list>
  </div>
</template>

<script>
import ProductList from '@/components/products/ProductList.vue';
  export default {
    name: 'home',
    data () {
      return {
        msg: 'Welcome to Your Vue.js App'
      };
    },
    components: {
      'product-list': ProductList
    }
  }
</script>
購物車
接著要修改購物車頁面 /src/views/Cart.vue 將商品資訊顯示出來。
<template>
  <div>
    <div class="title">
      <h1>{{msg}}</h1>
    </div>
    <template v-for="product in cart">
      <div :key="product._id" class="product">
        <p class="product__name">產品名稱:{{product.name}}</p>
        <p class="product__description">簡介:{{product.description}}</p>
        <p class="product__price">價錢:{{product.price}}</p>
        <p class="product.manufacturer">生產商:{{product.manufacturer}}</p>
        <img :src="product.image" alt class="product__image" />
        <button @click="removeFromCart(product._id)">從購物車中移除</button>
      </div>
    </template>
  </div>
</template>

<style>
.product {
  border-bottom: 1px solid black;
}

.product__image {
  width: 100px;
  height: 100px;
}
</style>

<script>
export default {
  name: "home",
  data() {
    return {
      msg: "Welcome to the Cart Page"
    };
  },
  computed: {
    cart() {
      return this.$store.state.cart;
    }
  },
  methods: {
    removeFromCart(productId) {
      this.$store.commit("REMOVE_FROM_CART", {
        productId
      });
    }
  }
};
</script>
同樣的加入 computed 對商品做預處理
這邊接收的是 this.$store.state.cart 也就是購物車中的商品列表
寫好觸發 Vuex mutation 中移出購物車的按鈕方法 removeFromCart
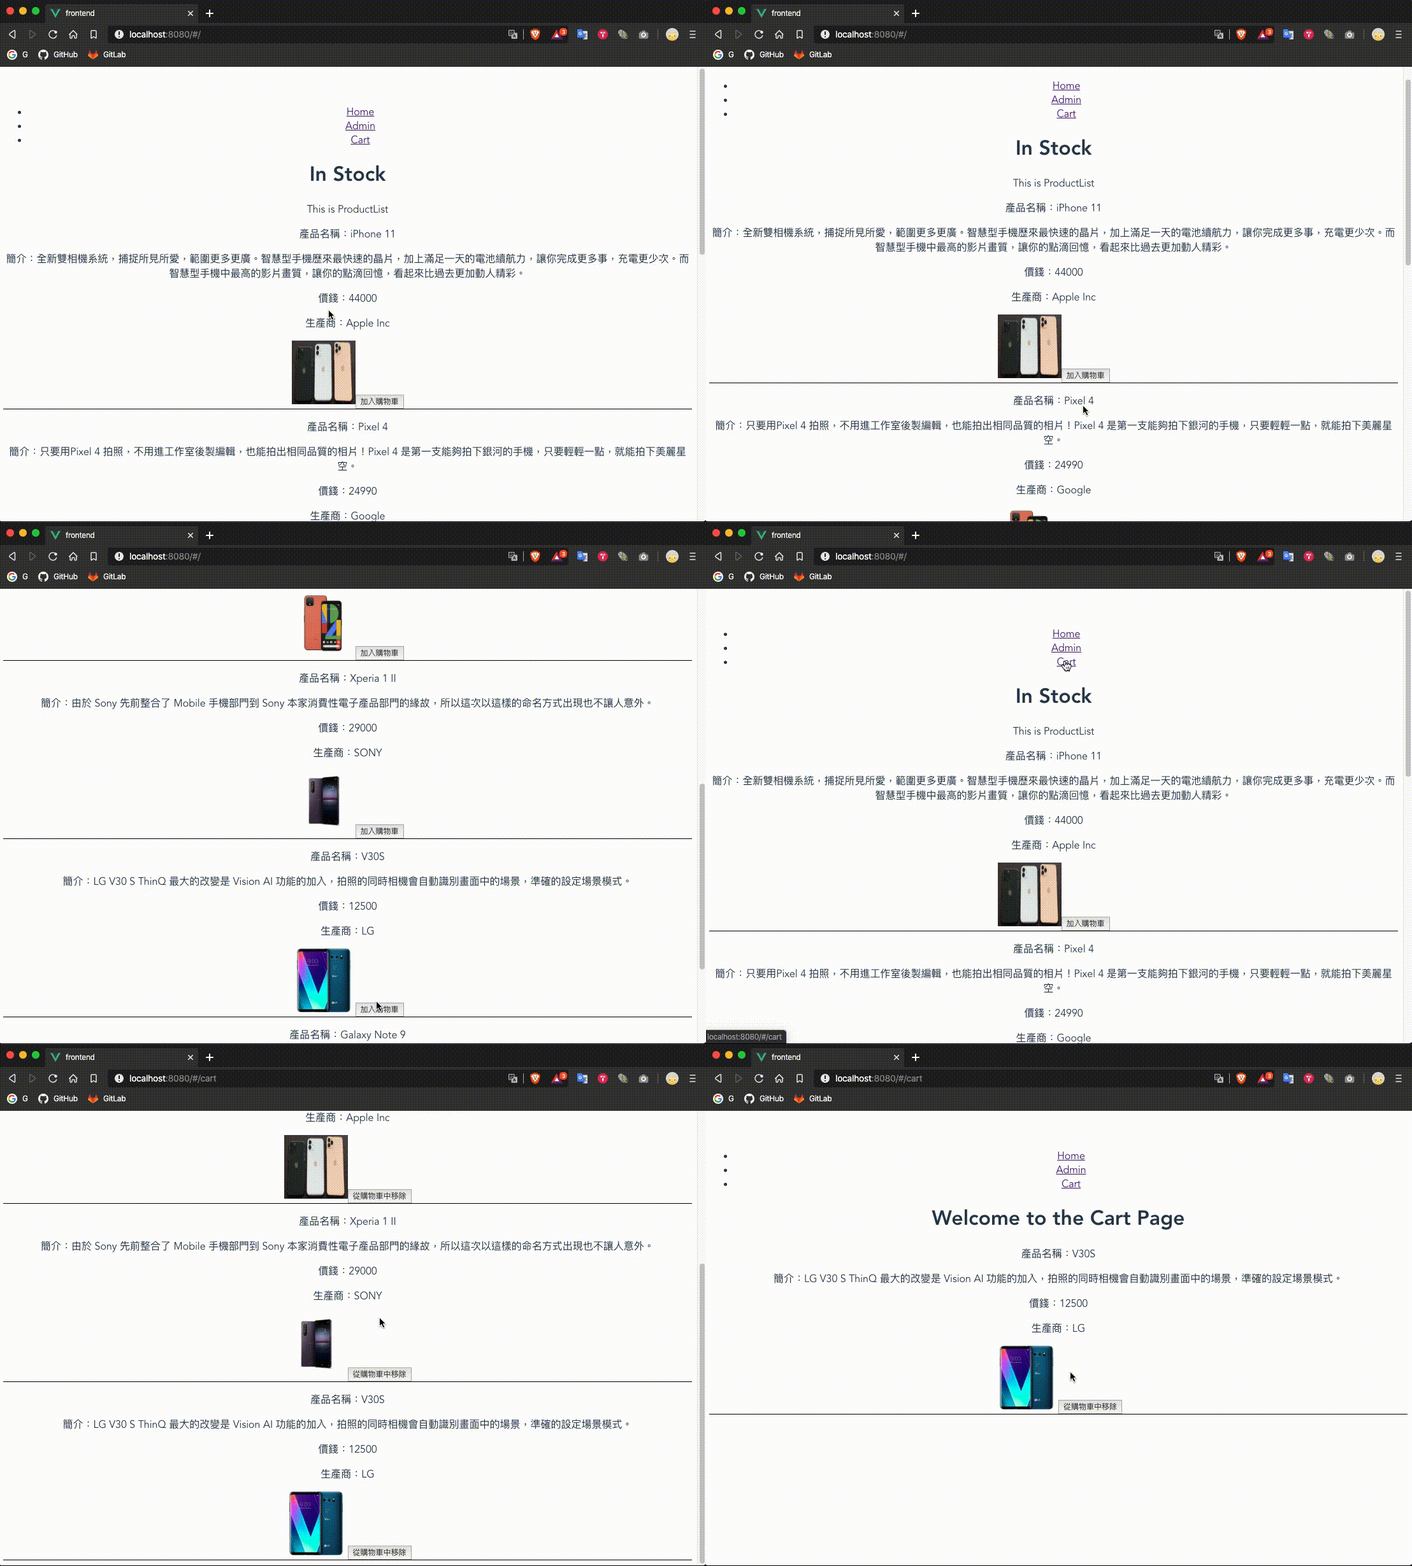
接著就可以開啟瀏覽器預覽執行結果

一開始購物車是空的,我們隨便加了幾款手機進購物車後,在購物車頁面可以看見剛剛有選中的商品!
而在購物車頁面可以將商品從購物車移除。
專案範例程式碼 GitHub 網址:ray247k/mini-E-commerce


